
 |
|
|||||||
| I'm new here, please be gentle This is where you can "introduce yourself". A chance for you as a new member to say hello and for you to tell us about yourselves, your truck and your other interests. |
 |
|
|
Thread Tools | Display Modes |
|
|
#1 |
|
Junior Member
Join Date: Aug 2010
Location: South West
Vehicle: Terrano II 2.7TDi
Posts: 11
|
Hi all
I'm a newbie to nissan4x4owners, however think I've at last found venue for my Terrano related queries :-). I own a 99 plate, Terrano II 2.7TD LWB (R20). My current task is to replace the air con condenser, as the core has sprung a leak, (confirmed when recently re-gased). Have been quoted £450 parts + labour for fitting a replacement condenser and a re-gas from local garage. For a laugh, I talked to local Nissan dealer and was quote approx £500 for supply of condenser only. Hence looking to remove old condenser, fit replacement myself then get re-gased. However, not sure how to physically remove the condenser from the engine bay having disconnected fan and air-con pipes, i.e remove from above or below. A central strut dropping down from the bonnet catch release restricts options for removal. Can anyone advise the steps for disconnecting and removing an air-con condenser from a Terrano II. (Note, checked the download page and didn't spot one for this task). A related query, should I also replace the air-con receiver/accumulator if i'm replacing the condenser (read this on the web whilst trawling for info). Appreciate any help/advice. Cheers Kevin |
|
|

|
|
|
#2 |
|
Senior Member
Join Date: Mar 2010
Location: peoples democratic republic of west yorkshire
Vehicle: " alice "
Posts: 10,473
|
|
|
|

|
|
|
#3 |
|
Junior Member
Join Date: Aug 2010
Location: South West
Vehicle: Terrano II 2.7TDi
Posts: 11
|
Hi Briggie,
Thanks for link to the R20 manual. Unfortuately it doesn't seem to cover actually removing/replacing the condenser unit. Hence, after some advice as to how I should tackle this. Cheers Kevin |
|
|

|
|
|
#4 | |
|
Senior Member
Join Date: Mar 2010
Location: peoples democratic republic of west yorkshire
Vehicle: " alice "
Posts: 10,473
|
Quote:

|
|
|
|

|
|
|
#5 |
|
Off road maniac
Join Date: Dec 2009
Location: Bexhill on Sea
Vehicle: Y60 Patrol Me, 3 ltr Mrs
Posts: 17,432
|
I do not have diesel but have just done some engine bay work on one with air con, and I would say remove the engine rad and fan and access should be good, I would only replace what is needed the less you disturb on AC the better, Rick
|
|
|

|
|
|
#6 |
|
Senior Member
Join Date: Apr 2008
Location: S Shropshire
Vehicle: Inbetween Terrano's !
Posts: 967
|
No no no no!!!!!!! (apols for the long and anal reply...)
Pop out the plastic grille by popping out the centres / quarter turn of the lower ones. Remove the one m6 bolt that holds the condensor fan bracket on the strut. The central vertical strut is secured at the bottom with an M8 bolt, reach it from under the vehicle. At the top, the strut is spot welded to the slam panel. With a new/sharp 8mm drill, drill out the spot welds one at a time. Drill one, then put in an m8 bolt to hold it in position then drill out the other. Important to do this so the bonnet catch does not move. Once you have the strut free, manouver it up and out and rest it to one side, catch and cable still attached. Remove the 2 condensor fan bolts by poking a loooong 1/4" extension through the bumper slots. Undo the wiring then wiggle the fan up and out. Carefully slip the high pressure line from the drier into the gap against the radiator. I would suggest you also carefully cut the 3 rubber strips off this line, as they love to corrode underneath. Remove the single bolt that holds the clamp just behind the slam panel on the passenger side Disconnect the refridgerant lines. NB these are often VERY tight, and the threads may strip as they love to corrode, so get ready to start crying when you need to replace one or both of the lines back to the drier and or compressor. (~£50 each) Use two good fitting spanners to support the joints. Replace the 0-rings, and ideally the drier if the system has been discharged for more than afew days. A bolt either side of the condensor and out it will come. Transfer the rubber mounts to the new one. I always add 10ml oil for a straight replacement after a slow leak. Vac for at least an hour and check it holds for another hour minimum, overnight preferably. Recharge as per the sticker. Hope this helps. 
|
|
|

|
|
|
#7 |
|
Junior Member
Join Date: Aug 2010
Location: South West
Vehicle: Terrano II 2.7TDi
Posts: 11
|
All
Thanks for the comments, Timbo 1975 a very comprehensive response, this will help no end. Picked up my replacement condenser today, for the princely sum of £98 quid :-). Shall commence the removal/refit over the weekend, suspect one or more refridgerant lines are in the offing :-( Timbo, you mention the drier, is that the receiver/accumulator I mention in my original post (referred to as the 'liquid tank' in the diagram on page HA-9 of the Heater and Air-con section of the R20 manual) Smallish metal cylinder mounted behind and to the left of the condenser with pressure switch on refiderant lines in and out. Just making sure I Understand. Thanks kevin |
|
|

|
|
|
#8 |
|
Off road maniac
Join Date: Dec 2009
Location: Bexhill on Sea
Vehicle: Y60 Patrol Me, 3 ltr Mrs
Posts: 17,432
|
Respect Timbo, I did say I did not have a Diesel and on my 2.4i I do not have AC so it was an assumption on my part, wrong in this case, another lesson learnt, you are right about the oil and the vac test, but not everyone has a vac pump I do and if any one local wants to borrow it just let me know, Rick
|
|
|

|
|
|
#9 |
|
Senior Member
Join Date: Apr 2008
Location: S Shropshire
Vehicle: Inbetween Terrano's !
Posts: 967
|
Solarman- indeed utter respect to you.
Drier - yes this is the cylinder that lives down the side of the battery, drivers side. I do my own a/c work, and have changed the condensor twice on the T2 !! |
|
|

|
|
|
#10 |
|
Off road maniac
Join Date: Dec 2009
Location: Bexhill on Sea
Vehicle: Y60 Patrol Me, 3 ltr Mrs
Posts: 17,432
|
I also do AC in fact I am just going to install a 3.5 kw heat pump inverter system using 410a, I also have 404a and of course 134a for mobile use, I still have a lot of systems with 502 and 22 but getting gas is not so easy, I do not do it in a big way, just existing old customers who do not want to go elsewhere, Rick
|
|
|

|
|
|
#11 |
|
Senior Member
Join Date: Apr 2013
Location: Near Dundee, Scotland
Vehicle: Nissan Terrano 3.0
Posts: 482
|
Fantastic thread! I too have to replace a condenser & was wondering what could be done regarding the central brace.
Superb! Thanks Timbo 
|
|
|

|
|
|
#12 |
|
Senior Member
Join Date: Apr 2013
Location: Near Dundee, Scotland
Vehicle: Nissan Terrano 3.0
Posts: 482
|
Just a follow-up to Timbo's information..............
I removed the condenser this afternoon as per his instructions & it was an absolute piece of cake  Not going to bother with any descriptions. It's pretty self-explanatory 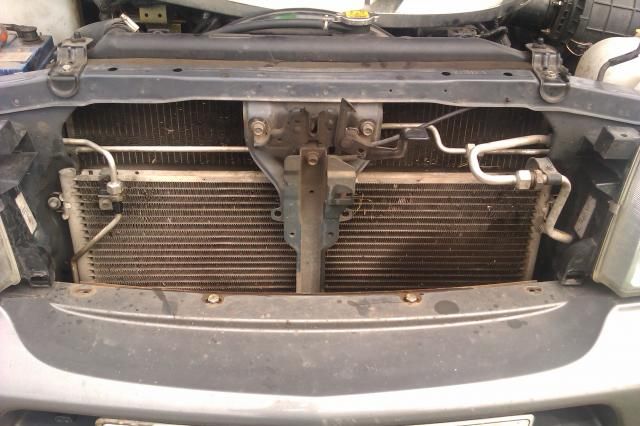 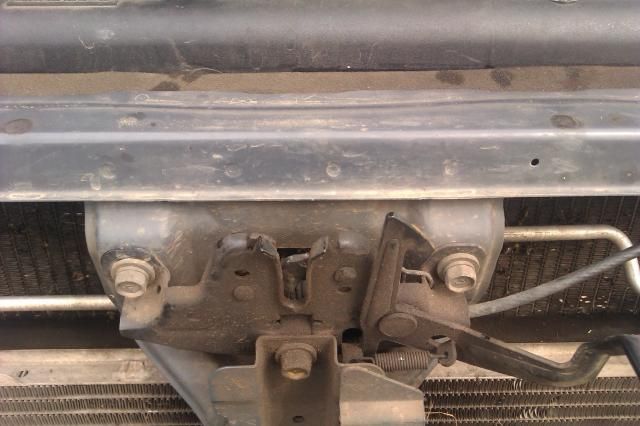 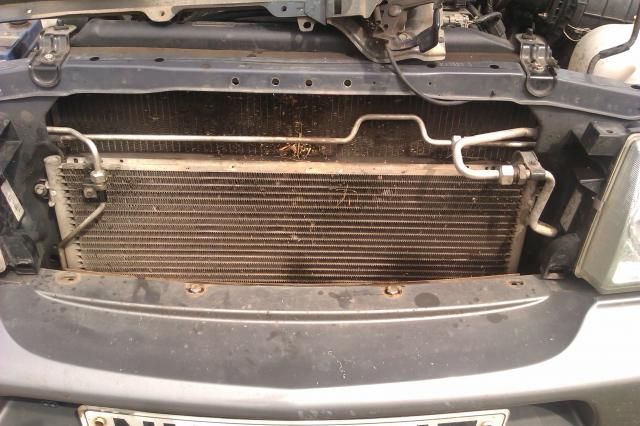 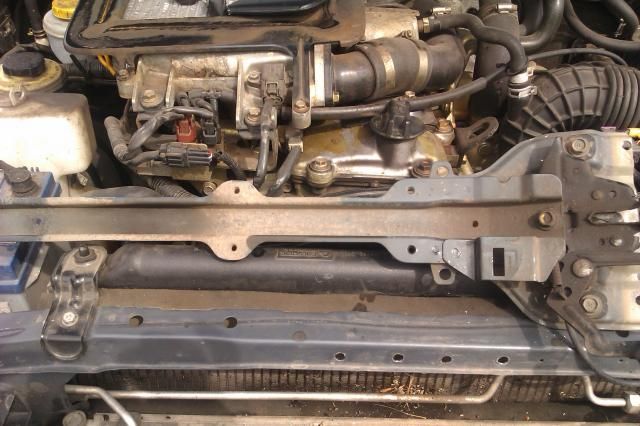 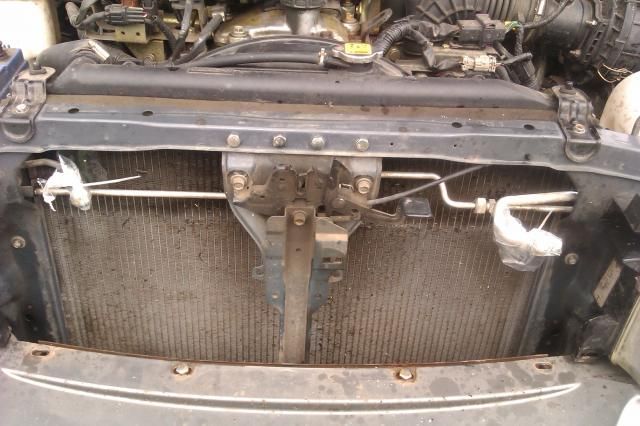 For the condenser pipes, you'll need a 17 & 19mm for the RHS (from the drivers perspective) and a 24mm for the LHS. The larger pipe connection I'm not sure of as I didn't have a large enough spanner so used my big adjustable. The bottom bolt for the brace has a 12mm head. It's a good idea to remove the screw securing the P-clip for the larger diameter pipe to the bulkhead too. this will give plenty of clearance to remove the condenser  This also gives you the opportunity to remove all the accumulated crap from between the radiators too |
|
|

|
 |
|
|